This site offers portrayals of regular maps in various two-dimensional surfaces. These surfaces are shown on your flat computer screen by using pink lines and symbols. The purpose of this page is to explain how to interpret these pink lines and symbols.
For those already acquainted with 2-manifolds other than the plane, this paragraph may be sufficient:
The Wikipedia page on Fundamental polygon, or this page on the Math of Non-Orientable Surfaces may also help. But if it is still not clear to you, please read the following.
I use the term "canvas" to denote a representation of a compact 2-manifold. A canvas usually has pink markings showing how to "sew it together". A canvas has a genus, and can be used to portray regular maps, Cayley diagrams, etc. in that genus.
Here ![]() inside the pink lines is
an ordinary piece of 2-space. Let's identify its left and right edges,
by sewing them together:
inside the pink lines is
an ordinary piece of 2-space. Let's identify its left and right edges,
by sewing them together: ![]() . This
gives us a cylinder. Or we could sew the opposite edges togther with
a half-twist:
. This
gives us a cylinder. Or we could sew the opposite edges togther with
a half-twist: ![]() . This gives us a
Möbius
strip. We can also sew both pairs of opposite edges. There are
three different ways to do this:
. This gives us a
Möbius
strip. We can also sew both pairs of opposite edges. There are
three different ways to do this: ![]() is a
torus,
is a
torus,
![]() is a
Klein bottle, and
is a
Klein bottle, and
![]() is a
projective plane.
is a
projective plane.
For the torus, I use a slightly different diagram from the above:
![]() .
.
 This differs from
![]() in two ways. First I have extended the
lines so that they cross each other and reach the edge of the diagram, like
this
in two ways. First I have extended the
lines so that they cross each other and reach the edge of the diagram, like
this ![]() . This is because the torus,
"unrolled" onto the plane, will look like the diagram to the right, and if
we take a piece of the diagram to the right, we see the lines crossing. The
second difference is that I have used light pink to shade the parts of the
diagram which are copies of what is within the pink borders. Thus there is
a one-to one correspondence between the torus itself and the non-pink
regions of the diagram.
. This is because the torus,
"unrolled" onto the plane, will look like the diagram to the right, and if
we take a piece of the diagram to the right, we see the lines crossing. The
second difference is that I have used light pink to shade the parts of the
diagram which are copies of what is within the pink borders. Thus there is
a one-to one correspondence between the torus itself and the non-pink
regions of the diagram.

I have now explained the two diagrams above (the first is a regular map, the second is a Cayley diagram). Look at them, and see how the edges which are meant to match up are indeed crossed by identical parts of the diagram.
I also use diagrams like this:  . Here,
each edge of the hexagon is identified with its opposite edge. This again
a torus, though this is less obvious.
. Here,
each edge of the hexagon is identified with its opposite edge. This again
a torus, though this is less obvious.

I have now explained the diagram above (a regular map). Look at it, and see how the edges which are meant to match up indeed do, and how regions shown in the white torus are repeated in the light pink regions.
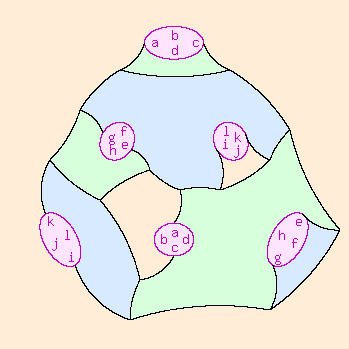
Suppose we want to add a "handle" to a diagram. Think of a teapot handle. We want to take such a handle, with the cut surfaces of its two ends lying in the same plane, and glue it onto our surface. Here is how we do it.
The places where the handle is glued on won't be part of the diagram any more,
and we will show them in light pink, surrounded by pink circles where the
surface of the handle is attached. We won't actually show the handle itself;
but to show how the two ends of it match up, we will use letters to show
what corresponds to what. This means that we can't have any interesting bits
of the diagram actually on the handle, just a line which run form end to end
of the handle, possibly spiralling round as they go. Here is what the two ends
of the handle might look like: ![]() and
and
![]() . Note that the letters go clockwise
around one, anticlockwise around the other, as required by the nature of a handle.
. Note that the letters go clockwise
around one, anticlockwise around the other, as required by the nature of a handle.
Another way of adding a handle to a surface is to have a handle that goes from the back of the image and bends through 360° all the way round to the front. This is illustrated by the two diagrams to the right, which are each of a torus. As it a 360° bend, the symbols appear in the same order at the two ends of the handle. There may be a twist to the handle, as in the first of the two diagrams to the right.
Such diagrams are little use in themselves, they are just another way to draw
a torus. But they may be useful with more handles added, as in the diagram to
the left, which has three handles, and is therefore of a surface of genus 3.
.png)
You should now be able to interpret the two diagrams above. If you click on either you will see a full-sized version of it. The first one is a not-quite-regular map, the second is a Cayley diagram.

An antihandle is like a handle, but with its two ends oriented in the same direction. Any manifold with an antihandle is non-orientable. Adding an antihandle to a manifold increases its genus by 2 and reduces its Euler number by 2.
The diagram to the right uses a torus plus an antihandle. It is therefore
of non-orientable genus 4, and its Euler number is -2.

Sometimes we use a simpler representation for handles and antihandles, as shown to the right. The letters show which handle-ends are to be paired up, and the tadpole-shaped symbol shows the orientation of each. Thus, in the diagram to the right, the two handle-ends labelled "a" both have clockwise-oriented tadpoles, and so together form an antihandle; and the two handle-ends labelled "b" have oppositely-oriented tadpoles, and so together form a handle.
 |

|
There is no need for the non-pink region to be connected. The first diagram to the right gives sewing instructions for Fortunatus's purse, described below. The second uses this version of the projective plane to portray a hemi-octahedron, with four triangular faces.
In some diagrams, for non-orientable manifolds, there are crosscaps, drawn
like this: ![]() .
Any two points directly across a crosscap from each other are identified
with each other.
.
Any two points directly across a crosscap from each other are identified
with each other.
I use the term "sewing" for the process of constructing a 2-manifold, because it is the first term I encountered for it. In Sylvie and Bruno Concluded SBC by Lewis Carroll, chapter 7 "Mein Herr", there is a description of how to sew a Fortunatus's purse from three pocket handkerchiefs.
The character "Mein Herr" describes the process. You take three square handkerchiefs. You sew two together along one edge, and then again along the opposite edges to those already sewn, but with a half-twist, to make a Möbius strip. You observe that it has a single edge, four handkerchief-sides long, just like the so far unused third handkerchief. You then sew the Möbius strip to the third hankerchief all along its edge.
If this final manoeuvre were physically possible, it would result in a projective plane. However a projective plane cannot be embedded in 3-space without self-intersection, and trying to sew a self-intersecting surface must fail, and results in a mess. Self-intersecting surfaces, including the projective plane, can however be knitted.
Regular maps drawn in various 2-manifolds
Cayley graphs drawn in various 2-manifolds.
Copyright N.S.Wedd 2009-2012